
Diamond Art / Diamond Painting..Love it or Hate it, it's everywhere!
- Terra
- Feb 7, 2019
- 5 min read
Updated: Mar 12, 2020
First off what is diamond art?
Diamond art is creating pixilated versions of images out of Rhinestones. Think cross stitch, paint by numbers, puzzles, "Where's Waldo" and bedazzling all rolled into one fabulous little craft. As I said you love it or you hate it. Either that sounded like heaven on Earth or your own personal hell.
The bigger your canvas the more detail you'll have and the better it will look. One of the only complaints I see is because they got too small of a size. Bigger is better and the fact that it includes everything you need it's not that expensive of a craft to get into. The trend has taken off to the point that you can Google whatever you love plus the words "diamond art" and you will find a ton of results all over the web. Ebay, Etsy, Amazon, Walmart, Micheal's...literally everywhere has them now. Prices range from a couple of bucks to over $100 with a little research you'll realize you shouldn't pay more than $50 unless you get into the LED ones.
Yes! You read that right LED diamond art! I will be venturing into that soon.
On average..
Small ones are $8-$10
Medium ones are $12-$20
Large ones are $22-$35
If you don't want to wait on shipping from overseas you will pay more. My orders have taken on average 3 weeks from overseas. I have also seen kits at Walmart in the craft section and Micheal's for instant gratification.
If they say square or circle drill it is referring to the rhinestones shape. Some people have a preference some don't to each their own both are pretty. I will be getting into the main differences between them below.
What you need to know before you buy...
Yes the kits are everywhere but so are the fly by night companies..
Read the reviews..
Look for customer images of the completed product..
Look for images that will pixilate well..
Read the description and make sure it is full drill meaning the whole image is made of rhinestones..
THOUGH, I have seen some gorgeous partial drill ones. Partial drill means only part of the image is made from rhinestones..
If they say square or circle drill it is referring to the rhinestones shape. Some people have a preference some don't to each their own both are pretty..
The circle ones give young little more forgiveness with placement since you are placing a circle in a square..
The square ones require more precision as you are fitting it into a box the exact same size..
If you frame them glass does take away from the sparkle a little..
Inventory everything so you can send for any replacements you need asap..
Many of the cheaper kits come from overseas and will take a few weeks. You can search for U.S./ local to you sellers but they will cost a few bucks more..
Resealable bags are your friend..
There are fun tools on Ebay if you get really into this but the ones that come standard are perfect to start with.

Some of the tools you will find.. there are also diamond rollers - One that can roll a row of 10 diamonds and one that acts like a rolling pin to smooth the diamonds down. I just use a rolling pin to do that though.
If being meticulous over tiny little dots isn't your thing this may not be your craft...
Now time to get into the actual crafting part of all of this...

First up lay everything out and take inventory. Make sure you have the right amount of diamonds and the right colors. You want to be able to notify the company of replacements needed asap so it doesn't affect your project.
Now get your tools ready..
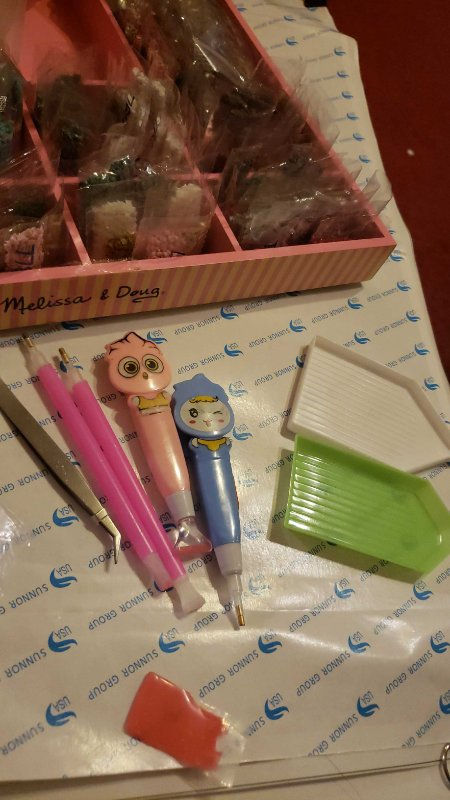
So a quick 101 on your new tool kit..
First up your trays

Sizes, colors and features will vary. They all have their own perks. Smaller ones are easier to manage but larger ones hold more rhinestones. The spout at the end is great for pouring the diamonds back into the bag when you're done but I have had diamonds slide out of it when I got distracted well shaking the diamonds.
How to use-
Pour one color of diamonds that you want to use into the tray and slowly, gently shake/shimmy the tray back and forth to get the majority of the diamonds facing upright. You will have to re-shake several times no matter how meticulous you are so there's no point in getting too obsessive over getting the all the diamonds upright.
Next up is your wax and applicator..

As I've already mentioned there are several types and styles of applicators. People even get custom ones made for a better grip. The standard ones that come with the kit usually have a single applicator tip on one end and a multi-diamond applicator on the other.
The pink rectangle that came with all of this is a wax that you fill the applicator tips with. Then you will lightly stick the top of the diamond to the applicator. Slide your applicator tip along the wax and pack and level the tip almost like flour when baking. Once you start applying diamonds you will want to remove any excess wax that builds up around the edges to prevent stray diamonds from tagging along. You will need very little of the wax and will need to reapply it once your diamonds stop sticking to the applicator. I have been using the same rectangle of wax since my first project and have barely made a dent in it. The paper its self is sticky so there is no need to worry about making the bottom of your rhinestone sticky.
Some kits come with tweezers in place of applicator or along with the applicators when using tweezers there is no need for wax.

I like to use posterboard and binder clips from the dollar store to attach the project to well I work on it. They are cheap and customizable without damaging the image. it also makes it portable so I can work on it any where.

So now that your applicators are filled and you are familiar with your tools time to finally peel back a portion of your film/paper covering and take a look at your image. You will want to peel it back as you go and reapply it when done for the session to preserve the glue.
Bead sorters or organization trays are great for sorting your rhinestone packets.

Companies that send the rhinestones in little ziplock are the best. Those that don't...take note.
Personally I like to write the correlating symbol on the bag to make it easier.

I also try and find a way to organize them so it's easier to find the symbols .
You want to pick a symbol that you see a large amount of in the section you're working on. Find the correlating number and color and pour it into your tray. Shake the tray to get a large amount facing upright. Take your applicator filled with wax and stick it to a diamond then apply it to the matching symbol.
This project is a round diamond project which I do feel was easiest for my first one...
At first I wanted to start at a corner...

But I quickly realized that wasn't the best tactic. Over all it is easier to expose a handful of row straight across and work your way up. Working from a corner leaves you a bit all of the place rather quickly.

The top picture is with sun behind it to show closer detail. The lower picture is against a solid background, to show how it will look hung up.


The projects I have done since are square diamonds, which are more difficult. They do provide more complete coverage but you will have to be more accurate and do more repositioning to make sure they're all in their place. Once you get the hang of it the projects go pretty quickly. My daughter has already started making requests and I love it because I can't paint for the life of me so this is my way of creating art for her.
Rainbowdash


Applejack


Click the photos below to be taken to the amazon page for that product


Comments